|
|
|
Who's Online
There currently are 5918 guests online. |
|
Categories
|
|
Information
|
|
Featured Product
|
|
|
 |
|
|
There are currently no product reviews.
 ;
A comprehensive Operating and Service Manual. All schematics are complete and easy to read. The PCB drawings and complete parts list are very helpful. I would definitely recommend this manual.
;
SCANNING OF HIGH QUALITY
VERY, VERY HIGH VELOCITY DOWNLOAD
VERY GOOD PRICE,
TRUE SATISFIED, THANKS
;
Genuine Toshiba owner's manual. Couldn't really ask for more. And written in understandable English in contrast to a few recent experiences I have had with manuals for other equipment other than Toshiba but made in China and written in "Chinglish"!
;
I purchased a vintage Sony mixer off eBay and within the hour was able to locate and purchase the manual for it.I mean really,where else can you find a manual for a product made in 1983!? It was easy to find and purchase/download the manual I needed.I will use this site again for other equipment I have! Great site!
;
manual de usuario perfecto y completo de buena calidad de impresion y muy detallado ideal !
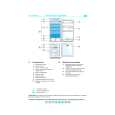
Clip Operations
Playing Back Clips
6
1
Chapter 6 Manipulating Clips with Thumbnails
Press the MODE button to enter the MCR mode.
� The thumbnail screen appears on the LCD monitor.
Pressing the STOP button during clip playback stops the playback and returns the display to the thumbnail screen.
<Note> When playback is stopped, the position of the pointer remains on the clip that was being played back, regardless of where the playback started.
2 3
Use the cursor buttons to move the pointer over the desired clip. Press the PLAY/PAUSE button, and the clip under the pointer will be played back on the LCD monitor.
� After playback of the clip under the pointer, subsequent clips are played back in order, according to when they were shot. The thumbnail screen returns after the last clip has been played back.
<Notes> � When playing back clips, it is not necessary to �select� the clips (blue frames around the thumbnails). � Clips with clip numbers displayed in red cannot be played.
Shot Mark
A shot mark can be added to a clip thumbnail to distinguish this clip from the others.
1
Press the MODE button to enter the MCR mode.
� The thumbnail screen appears on the LCD monitor.
2 3
Use the cursor buttons to move the pointer over the clip to which you want to attach a shot mark. Press the USER button to which the shot mark function has been assigned.
� Use the setting menu SW MODE screen to assign the SHOT MARK function to a USER button.
4
During playback, pressing the REW button starts 4� speed reverse playback, and the FF button starts 4� speed fast playback.
� Press the PLAY button to return to normal playback.
5
During clip playback, pressing the STILL button will temporarily stop (pause) the process.
� During a pause, pressing the REW button moves the pause position to the beginning of the clip. � Pressing the REW button again moves the pause position to the beginning of the previous clip. � During a pause, pressing the FF button moves the pause position to the beginning of the next clip.
USER MAIN, USER1 and USER2 buttons
4
98
Clip Operations
A shot mark will be attached to the clip thumbnail under the pointer.
� To delete a shot mark, reposition the pointer over the clip and press the Shot Mark button.
|
|
|
> |
|