|
|
|
Who's Online
There currently are 5982 guests online. |
|
Categories
|
|
Information
|
|
Featured Product
|
|
|
 |
|
|
There are currently no product reviews.
 ;
Thank you for your manual It has the basic things to and i use the Oszi for Longer Time.
THX
;
Actually, I was looking for this information for 3 years!...now thanks to you, the manual is on my hands and of great help, cause I understand now where I was doing wrong connections and wires...excellent, I'll be back to you if in need, thank you.
 ;
This manual covers the main equipment features only. While it also includes the procedure for saving and loading from the now long obsolete memory cards it does not mention the how to operate with the optional floppy drive interface so I am still at a loss about how to use this! Note that there is a separate manual covering the MIDI interface and programming via the keyboard, not included in this download. You will also need to get hold of this if you want to use the MIDI interface properly. Basically there is little difference between this manual and the free to download manual for the similar PR60 model.
;
Good list of manuals. I found a very rare one and easily get. Should be promptly to download, as we must to wait hours even after confirmed payment.
;
The manual was properly scanned and perfectly readable. The only small problem is that I couldn't use my dear Ctrl + F to find a word I needed.
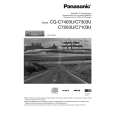
Opérations générales
Ce chapitre explique comment mettre sous tension ou éteindre l�appareil, comment régler le volume, etc.
Retrait/remise en place du panneau avant Activation ou désactivation de
Mise sous tension
Appuyer sur la touche [SRC/PWR] (PWR: Alimentation).
(PWR: Alimentation)
Mise hors tension
Maintenir la touche [SRC/PWR] (PWR: Alimentation) enfoncée jusqu�à ce qu�un bip se fasse entendre, puis la relâcher.
Il est possible de retirer le panneau avant pour l�empêcher d�être volé.
3 Mettre le panneau avant dans le boîtier.
Retrait
Remise en place
1 Mettre l�appareil hors tension (a page 52) 2 Appuyer sur [ ]
(Déblocage).
(Le panneau avant est détaché avec un clic.) (Système antivol)
1 Faire glisser le côté gauche du panneau
avant pour le mettre en place.
l�alimentation
Le panneau avant se ferme automatiquement au bout de 5 secondes lorsqu�il est ouvert. Si l�appareil est sous tension, il se met automatiquement hors tension.
2 Appuyer sur l�extrémité droite du panneau
avant jusqu�à ce qu�un déclic soit entendu.
devenir excessivement chaud. ¡ Ne pas toucher aux contacts du panneau avant amovible ni à ceux de l�appareil principal étant donné que cela peut entraîner de mauvais contacts électriques par la suite. ¡ Si des saletés ou de la poussière se sont déposées sur les contacts, les retirer soigneusement avec un chiffon sec et propre. ¡ Ne pas appuyer fortement vers le bas sur le panneau avant quand il est ouvert et ne rien poser dessus car ceci risque de l�endommager.
Précautions:
¡ Il est recommandé de démonter ou monter le panneau avant lorsque celui-ci est en position fermée. Ne pas démonter le panneau lorsqu�il est en mouvement. ¡ Noter que ce panneau avant amovible n�est pas étanche à l�eau. Ne pas l�exposer à l�eau ni le laisser en présence d�une humidité excessive. ¡ Ne jamais essayer de retirer le panneau avant amovible en conduisant. ¡ Ne pas laisser le panneau avant amovible sur le tableau de bord ou dans un endroit susceptible de
52
CQ-C7403U/C7303U/C7203U/C7103U
|
|
|
> |
|