|
|
|
Who's Online
There currently are 5896 guests online. |
|
Categories
|
|
Information
|
|
Featured Product
|
|
|
 |
|
|
There are currently no product reviews.
 ;
Very good detail, all pages clear, exactly what I needed
;
Excellent service, and just what I needed to service my TU-7700. All pages of the manual are clear and easily readable.
;
Excellent printing quality.
A complete and very usefull service manual with all details.
GREAT SERVICE AT VERY LOW PRICE!
A+++++++++++++++++++++++++
;
We received the manual in a timely manner and it was exactly what we were expecting. Excellent replacement for original Service Manual.
All schematics are very legible. We are really satisfied.
;
We received the manual in a timely manner and it was exactly what we were expecting. Excellent replacement for original Service Manual.
All schematics are very legible. We are really satisfied.
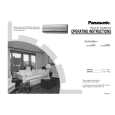
CS-A18CKPG CU-A18CKP6G
11.1.6. Gas charging
(After Evacuation)
Procedure: 1. Connect the charge hose to the gas charging cylinder. � Connect the charge hose which you disconnected from the vacuum pump to the valve at the bottom of the cylinder. 2. Purge the air from the charge hose. � Open the valve at the bottom of the cylinder and press the check valve on the charge set to purge the air. (Be careful of the liquid refrigerant). The procedure is the same if using a gas cylinder. 3. Open the valve (Low side) on the charge set and charge the system with liquid refrigerant. � If the system cannot be charged with the specified amount of refrigerant, it can be charged with a little at a time (approximately 150g each time) while operating the air conditioner in the cooling cycle; however, one time is not sufficient, wait approximately 1 minute and then repeat the procedure. (pumping down-pin) 4. Immediately disconnect the charge hose from the 3-way valve�s service port. � Stopping partway will allow the refrigerant to be discharged. � If the system has been charged with liquid refrigerant while operating the air conditioner, turn off the air conditioner before disconnecting the hose. 5. Mount the valve caps and the service port caps. � Use a torque wrench to tighten the service port nut. � Be sure to check for gas leakage.
51
|
|
|
> |
|