|
|
|
Who's Online
There currently are 5977 guests online. |
|
Categories
|
|
Information
|
|
Featured Product
|
|
|
 |
|
|
There are currently no product reviews.
 ;
Great manual and fast service. Download was possible after a few hours.
;
thanks a lot.
without the service manual my handycam was going to the trash.
good job, go on.
bye
 ;
This service manual is a good copy of the original, complete and fully readable. It is really useful to repair my Tv set following its clear instructions.
;
Excellent quality. Easy process to download. No issues or problems at all - was exactly what I was looking for and needed. Great service.
;
I was having a hard time finding the problem with this Mackie 1604 unit. I didn't have a schematic. Went looking on the web and found your site and the price was more then reasonable. Ordered it and within the hour had the manual and within 15 minutes had the unit fixed. Best $4.99 I ever spent. Thank you.
Doug
CS-A181KR
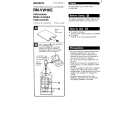
1 Evacuation of Installation
When installing an air conditioner, be sure to evacuate the air inside the indoor unit and pipes in the following procedure. Required tools: hexagonal wrench, adjustable wrench, torque wrenches, wrench to hold the joints, gas leak detector, and charging set.
(Indoor unit) (Liquid side) 3-way valve Close
The air in the indoor unit and in the piping must be purged. If air remains in the refrigeration pipings, it will affect the compressor, reduce the cooling capacity, and could lead to a malfunction.
(Outdoor unit)
(Gas side)
3-way valve OPEN Close Vacuum pump
Lo Hi
OPEN
Service port cap Be sure, using a torque wrench to tighten the service port cap (after using the service port), so that it prevents the gas leakage from the refrigeration cycle.
Procedure:
(1) Connect a charging hose with a push pin to the Low and High sides of a charging set and the service ports of a 3-way valves. q Be sure to connect the end of the charging hose with the push pin to the service port. (2) Connect the centre hose of the charging set to a vacuum pump. (3) Turn on the power switch of the vacuum pump and make sure that the needle in the gauge moves from 0 cmHg (0 MPa) to �76 cmHg (�0.1 MPa). Then evacuate the air for approximately 10 minutes. (4) Close the valve of both the Low and High sides of the charging set and turn off the vacuum pump. Make sure that the needle in the gauge does not move after approximately 5 minutes. BE SURE TO TAKE THIS PROCEDURE IN ORDER TO AVOID REFRIGERANT GAS LEAKAGE. (5) Disconnect the charging hose from the vacuum pump and from the service ports of the 3-way valves.
� 26 �
(6) Tighten the service port caps of both the 3-way valves at a torque of 18 N�m with a torque wrench. (7) Remove the valve caps of both the 3-way valves. Position both of the valves to �open� using a hexagonal wrench (4 mm). (8) Mount valve caps onto both of the 3-way valves. q Be sure to check for gas leakage.
Caution
If gauge needle does not move from 0 cmHg (0 MPa) to �76 cmHg (�0.1 MPa) in step (3) above, take the following measures: If the leaks stop when the piping connections are tightened further, continue working from step (3). If the leaks do not stop when the connections are retightened, repair the location of the leak.
|
|
|
> |
|