|
|
|
Who's Online
There currently are 5879 guests online. |
|
Categories
|
|
Information
|
|
Featured Product
|
|
|
 |
|
|
There are currently no product reviews.
 ;
Good quality instructions manual. Very useful to me. Quick and excellent service from Owner-Manuals... Thanks !!!
;
Sono molto soddisfatto e, quando mi necessiterà, mi avvarrò nuovamente di questo servizio!
;
A comprehensive Operating and Service Manual. All schematics are complete and easy to read. The PCB drawings and complete parts list are very helpful. I would definitely recommend this manual.
;
SCANNING OF HIGH QUALITY
VERY, VERY HIGH VELOCITY DOWNLOAD
VERY GOOD PRICE,
TRUE SATISFIED, THANKS
;
Genuine Toshiba owner's manual. Couldn't really ask for more. And written in understandable English in contrast to a few recent experiences I have had with manuals for other equipment other than Toshiba but made in China and written in "Chinglish"!
Recording from an external source
This function can be used to make up an edited tape from other recordings or video sources. A new scene can be added to the end of previous one. Recording VCR
To Delete all of a Cassette�s Contents (Tape Refresh Function)
You can delete a cassette contents (the picture, the sound and the Jet Navigator data) all at once. Operations 1 Be sure to set [JET NAVIGATOR] to [ON] when you want to delete all contents of a cassette that is recorded while setting [JET NAVIGATOR] to [ON]. Be sure to set [JET NAVIGATOR] to [OFF] when you want to delete all contents of a cassette that is recorded while setting [JET NAVIGATOR] to [OFF] or is recorded on another VCR. (See page 8.) 2 Insert a cassette that you want to delete the cassette contents.
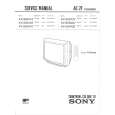
(1)
TIMER REC
REC/OTR
/I
L2
(2)
R2
IN (AV1)
OUT
(3)
(1) AV 1 (VIDEO IN (43)/AUDIO IN (46)) (2) AV 2 (VIDEO IN (36)/AUDIO IN (37)) (3) Other VCR or Video movie camera
3 Press [MENU] (9) to display the Main menu on the screen. 4 Press [43] (28) to select the [TAPE REFRESH], and then press the [ENTER] (26).
TAPE REFRESH START: ENTER END:STOP
Preparations � Connect a video movie camera or another VCR to this VCR as shown. � Display the VCR picture on the TV. � Insert the cassette on which the copying is to be performed, and make sure that its erasure prevention tab is not broken out. � Select the audio/video source required by pressing [INPUT SELECT] (6) to set A1 or A2. A1: A2: Through the AV1 (AUDIO IN/VIDEO IN) sockets. Through the AV2 (AUDIO IN/VIDEO IN) sockets on front panel.
5 Press [ENTER] (26) for 2 seconds or more to start the tape refresh function.
TAPE REFRESH
END:STOP
Operations 1 Press [PLAY] (8) to start playback. 2 At the point where you want to join a new scene, press [PAUSE/SLOW] (29) to put it in the still playback mode. 3 Press [REC] (15) to put it in the recording pause mode. 4 Start playback on the source unit and search for the point from which you want to record (copy) onto this VCR. 5 When that point is reached, press [PAUSE/SLOW] (29) again to start recording the new picture and sound from the playback unit. 6 To record (copy) additional scenes, press [PAUSE/ SLOW] (29) to put this VCR in the recording pause mode and then perform above steps 4 and 5 again. 7 At the point where you want to stop recording, press [STOP] (12) to finish recording. Note: � If you leave the VCR in the recording pause mode for more than 5 minutes in step 3 or 6, the VCR automatically switches over to stop mode to protect the video heads.
The tape is rewound to the beginning, and it is fast-forwarded with the tape refresh function. When the tape reaches the end, the VCR automatically rewinds it to the beginning. Note: � When a video cassette with a broken off erasure prevention tab is inserted, this function is not activated.
12
|
|
|
> |
|