|
|
|
Who's Online
There currently are 5750 guests online. |
|
Categories
|
|
Information
|
|
Featured Product
|
|
|
 |
|
|
There are currently no product reviews.
 ;
The manual is great help for me, i'm happy to have it,thanks
 ;
Very pleased with manual except that a few more details in the drawings might make the job (not yet done, tut-tut) easier. Should be adequate though. Actually I didn't have to pay for this anyway as I was given credit for another item that wasn't quite complete. Good service, then.
;
Very useful manuals, somewhere graphics not very clear!
;
A great manual; it contained all the information I required and allowed me to restore the receiver to full working condition!
;
Very good expirience with owner-manuals.com.
5 Stars; In future if necessary, i´ll download manuals on this site.
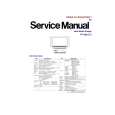
b. Focus Adjustment
1) Confirm that each of the pixels in the nine portions is clearly visible.
c. Electrical Picture Position Adjustment
1) Adjust OPT HPOSI so that �C� is symmetrical to �D.� by pressing the VOLUME UP/DOWN key on the remote to change the value. 2) Press the CH UP/DOWN key on the remote to return to the OTHER menu. 3) Select OPT VPOSI by pressing CH UP/DOWN key on the remote. 4) Adjust OPT VPOSI so that �A� is symmetrical to �B� by pressing the VOLUME UP/DOWN key on the remote to change the value.
"E" "I" "A" "F" "J"
OPT OPT HPOSI VPOSI 16 FE
OPT OPT
HPOSI VPOSI
16 FE
<Focus Screen>
2) If not, loosen the Knob on the Projection Lens until the Knob can be moved.
"C"
"D"
Knob Tighten Loosen
"K" "G" "B" <Focus Screen> "H" "L"
Up
"C"
"D" width "c" = width "d" width "c" "A" width "d"
Down
width "a" width "a" = width "b" width "b" "B"
<Front View>
Fig. 4-7 3) Adjust the Knob by moving up or down so that each of the pixels in the nine portions is clearly visible to obtain the best focus. 4) Tighten the Knob. Note: Focus Adjustment is not normally necessary. Perform this adjustment only if necessary.
5) Confirm that all �A�, �B�, �C�, �D�, �E�, �F�, �G�, �H�, �I�, �J�, �K�, �L� are each almost symmetrical. 6) If not, adjust the �OPT HPOSI� and �OPT VPOSI� (repeat steps 1-6) until the picture is in the correct position. 7) Press the CH UP/DOWN key on the remote to return to the OTHER menu.
|
|
|
> |
|