Quality scan of the original. All the detail necessary to troubleshoot, repair and adjust the unit. I'm sure I will be downloading more manuals in the future as the need arises.
Well.. I'd searched for this manual and although I found many copies online I was pleased to find your website with a well balanced pricing system and easy to search and follow links. That together with the very quick response time was just what I was looking for.. being a very impatient tech.. ;-) I had the service manual in front of me within a short time.
Bookmarked.. and you can bet I will always come here first for my service & user manuals..
best regards
Ed(Tony) Foley
G7WHK
I will definitely be back for more information when I need it.
Text excerpt from page 16 (click to view)
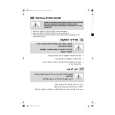
2. Remove the tape from the tape path. 3. Rewind the tape into the cassette by rotating the Center Clutch Unit counterclockwise. 4. Unhook Spring (A) of the Drive Rack Arm. 5. Remove Screw (A). 6. Lift the Cassette Up Ass'y. While pulling the Cassette Up Ass'y out far enough so that it clears the Drive Rack Arm, slide the Drive Rack Unit as indicated by the arrow to remove the cassette tape from the Cassette Up Ass'y. 7. Check the cause of mechanical trouble and repair.
Fig. 6-3
5.1.8.1.2. Method -2:
1. Rotate Loading Motor counterclockwise with needlenose pliers, etc. so that the Pinch Roller is separated from the shaft of the Capstan Rotor Unit.
16