|
|
|
Who's Online
There currently are 6043 guests online. |
|
Categories
|
|
Information
|
|
Featured Product
|
|
|
 |
|
|
There are currently no product reviews.
 ;
Item as described, very well detailed manual with complete schematics. I've received the download information shortly after payment, very good support.
 ;
Really good and well scanned. File is complete the full service manual for 5$
;
Good product and very helpfull to repair. Many thanks.
;
Very good product. Best service manual. Many thanks
;
I am only search for 5 Minute, by it in 5 Minutes to and get ist in few ours! Best i found in the Internet and my Amplifer is repaired as well! Thank you
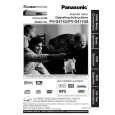
and unplugged AC Plug. Installation of Front Panel Ass'y
CAUTION:
Opener Lever may be damaged when Front Panel Ass'y is installed, with Cassette Door-Lid of Front Panel Ass'y and Opener Lever of Cassette Up Ass'y set incorrectly. A. When installing the Front Panel Ass�y, swing the Cassette Door-Lid all the way open until the Cassette Door tab clears the Opener Lever. B. Make sure that all locking tabs are aligned properly. Then, press the Front Panel straight in.
Fig. D3
3. Installation of VCR Chassis Unit When installing 2 Screws (515), slide the Holder Unit of the Cassette Up Ass'y (Refer to "WHEN LOADING WITHOUT A CASSETTE" in Service Notes) to tighten screws. Then, slide it back to the EJECT Position. 4. Removal of DVD Sub C.B.A. A. Remove solder portions "a," "b," and "c" on the DVD Sub C.B.A. B. Remove the DVD Sub C.B.A. while releasing the Locking Tab. Installation of DVD Main C.B.A. and DVD Sub C.B.A. A. Confirm that the Lever A is positioned as shown, and install the DVD Sub C.B.A. with the Locking Tab and 2 bosses.
24
|
|
|
> |
|