|
|
|
Who's Online
There currently are 5859 guests online. |
|
Categories
|
|
Information
|
|
Featured Product
|
|
|
 |
|
|
There are currently no product reviews.
 ;
First class Service,
best quality, come again
Thank You.
vac
;
I didn't realise a manual for an early plasma TV such as the one we were gifted could be so easily obtained. No manual was supplied with it, and as senior citizens we were a little puzzled over some aspects of its use. I do not want a listing for your store credit as we are not fairly big computer users. The manual was well organised, as it should be, with its backing of the Pioneer name. The download was prompt and everything worked quite smoothly. Thank you. Gordon.
;
Thank you very much for the manual. It is what I needed and it will be very helpful to me. The delivery of the manual was easy and very fast. I strongly recommend this site to other users. Best regards.
 ;
Excellent!! Got what I need and very fast!! Thank You
;
Manual acquired with good resolution, complete in all its pages, very good policy of the folder where are saved all products purchased.
SA-HT640WP / SA-HT640WPC
Step 4 Remove the mechanism base block.
10.6. Disassembling the Rear Panel
· Follow (Step 1) to (Step 2) of Item 10.3. Step 1 Remove 7 screws. Step 2 Detach the FFC cable from connector (CN5704). Step 3 Release the claws of the rear panel in the directions. Step 4 Remove the rear panel in the direction of arrow.
10.8. Disassembling the FL & Head phone P.C.B.
· Follow (Step 1) to (Step 7) Item 10.4. Step 1 Remove 3 screws. Step 2 Remove the panel angle.
Step 3 Remove 7 screws.
10.7. Disassembling the Mechanism Base Assembly
· Follow (Step 1) to (Step 3) Item 10.5. Step 1 Remove 2 screws on each side of the mechanism base block. Caution: Take note of the screw type used. During assembling, use the correct screw type and at the correct location. Step 2 Remove the tab. Step 3 Detach FFC cables at connectors (CN2005 & CN2001).
Step 4 Remove the FL & Head phone P.C.B.
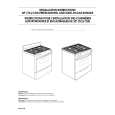
10.9. Disassembling the Main P.C.B.
· Follow (Step 1) to (Step 4) of Item 10.6. · Follow (Step 1) to (Step 4) of Item 10.7. Step 1 Remove 3 screws and 2 screw covers. Step 2 Detach the FFC cables from connectors (CN2011, CN5701, CN5708). Step 3 Remove the sheild plate. Step 4 Remove the Main P.C.B. 39
|
|
|
> |
|