|
|
|
Who's Online
There currently are 6043 guests online. |
|
Categories
|
|
Information
|
|
Featured Product
|
|
|
 |
|
|
There are currently no product reviews.
 ;
The purchased manual is an scan of the original Panasonic paper-based Service Manual. Unfortunately the contrast is not perfect, but I am satisfied anyway!
 ;
The purchased manual is an high-quality scan of the original JVC paper-based Service Manual. The Service Manual includes the Owner´s Manual, so you do not have to buy both of them.
;
It paid to find this Service Manual, couldn't find it anywhere else. Exactly what I wanted. Received within 24 hours.
;
Complete manual with clear schematic diagrams and printed circuit board layouts of two variants of the headset and the transmitter an old and a new version.
Also shows how the headset and the transmitter is opened and how transmitter and receivers can be adjusted and where to measure.
I had no problems to repair the headset using this service manual.
;
Excellent printing quality. A complete and very useful manual with all details.
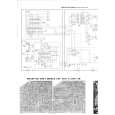
TH-37PR9U / TH-42PR9U
8. Disconnect the coupler(DA5). 9. Remove the Flexible Cable from the couplers(DA2). 10. Remove the 4 screws and then remove the DA-Board Block.
18. Remove the 7 screws ( ) and then remove theSC-Board and the clamper. 19. Remove the 2 screws ( ) and then remove the Plate.
11. Disconnect the couplers(P2, P9, P11, P12, P23, P25). 12. Remove the 6 screws ( ) and then remove the P-Board. 13. Remove the 5 screws ( ) and then remove the AC-Inlet Block and the clamper.
20. Disconnect the couplers(SS23, SS34). 21. Remove the Flexible Cable from the couplers(SS41, SS42, SS43, SS44). 22. Remove the 6 screws ( ) and then remove the SS-Board. 23. Remove the 1 screw ( ) and then remove the Ferrite Core.
14. Disconnect the coupler(D20). 15. Remove the Flexible Cable from the couplers(D31, D32). 16. Remove the 4 screws and then remove the D-Board. 24. Remove the 8 screws ( ) and then remove the Flexible Cable from the couplers(CB1, CB2, CB3, CB4, C12). 25. Remove the 4 screws ( ) and then remove the C1-Board.
17. Remove the SU-Board and the SD-Board. (Reference to Removal of the SU-Board and the SD-Board) 25
|
|
|
> |
|