|
|
|
Who's Online
There currently are 6043 guests online. |
|
Categories
|
|
Information
|
|
Featured Product
|
|
|
 |
|
|
There are currently no product reviews.
 ;
Very good service and quick service, very good quality of service manual!
;
Great tape deck manual!
I'm very positively surprised, because it is a very long manual, lot of pages, drawings, diagrams, description of how to make the alignment and adjustment procedures.
It is as good as the old "Naka" manuals from the 1970's - if somebody have seen them, they know what I mean by that.
I recommend to buy this very much !
;
I am a vintage hifi collector. No way to fix that device without the appropriate service manual...thanks to your site I got it and every thing is easier now. I got the manual right after ordering: fast cheap accurate ... thank you
;
Wonderful job clear. Qick fantastic. These people are really good. If even a problem arise they are wonderful assisting you. These scheme is so net despite this is a very old TV. Thank you for everything!!!!!!!!
;
Detailed schematic diagram, manual for professionals
PV-D300 / VM-D100 / PV-L550 / PV-L600 / PV-L650 / VM-L450
5.1.7.
CAUTION:
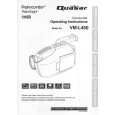
HOW TO REMOVE A JAMMED TAPE
If loading does not start after DC Power Supply is applied, DO NOT continue applying DC Power Supply.
5.1.7.1.
Remove a jammed tape as follows:
1. Remove a Screw and remove the EVR Cover.
Fig. 4-2
5. Open the Cassette Cover fully.
Fig. 4-1
6. Remove the tape slack by rotating the Takeup Reel Gear of the cassette tape as shown in Fig. 4-3.
2. Place the unit with the Cassette Cover facing upward. 3. Connect the TP Board Kit through the TP Board slot. 4. Apply +3VDC Power Supply to TP20 (+) and TP21 (-) on the TP Board to unload the mechanism. It normally takes approx. 6 seconds to unload the Mechanism to EJECT position. Then, remove the Power Supply and remove the TP Board Kit.
Fig. 4-3
7. Take out the cassette tape. 8. Connect the Power or Battery to set the Mechanism to STOP Position.
20
|
|
|
> |
|